[웹개발] JQuery, Fetch
추억의 앨범 HTML
첫 번째 글에서 배웠던 내용을 바탕으로 만들었던 추억의 앨범 HTML을 사용하도록 하겠습니다
1
2
3
4
5
6
7
8
9
10
11
12
13
14
15
16
17
18
19
20
21
22
23
24
25
26
27
28
29
30
31
32
33
34
35
36
37
38
39
40
41
42
43
44
45
46
47
48
49
50
51
52
53
54
55
56
57
58
59
60
61
62
63
64
65
66
67
68
69
70
71
72
73
74
75
76
77
78
79
80
81
82
83
84
85
86
87
88
89
90
91
92
93
94
95
96
97
98
99
100
101
102
103
104
105
106
107
108
109
110
111
112
113
114
115
116
117
118
119
120
121
122
123
124
125
126
127
128
129
130
131
132
133
134
135
136
137
138
139
140
141
142
143
144
145
146
147
148
149
150
151
152
153
154
155
156
157
158
159
160
161
162
163
164
165
166
167
168
<!DOCTYPE html>
<html lang="en">
<head>
<meta charset="utf-8" />
<meta name="viewport" content="width=device-width, initial-scale=1, shrink-to-fit=no" />
<link href="https://cdn.jsdelivr.net/npm/bootstrap@5.0.2/dist/css/bootstrap.min.css" rel="stylesheet" integrity="sha384-EVSTQN3/azprG1Anm3QDgpJLIm9Nao0Yz1ztcQTwFspd3yD65VohhpuuCOmLASjC" crossorigin="anonymous" />
<script src="https://ajax.googleapis.com/ajax/libs/jquery/3.5.1/jquery.min.js"></script>
<script src="https://cdn.jsdelivr.net/npm/bootstrap@5.0.2/dist/js/bootstrap.bundle.min.js" integrity="sha384-MrcW6ZMFYlzcLA8Nl+NtUVF0sA7MsXsP1UyJoMp4YLEuNSfAP+JcXn/tWtIaxVXM" crossorigin="anonymous"></script>
<script src="https://code.jquery.com/jquery-3.2.1.slim.min.js"></script>
<script src="https://cdnjs.cloudflare.com/ajax/libs/popper.js/1.12.9/umd/popper.min.js"></script>
<script src="https://maxcdn.bootstrapcdn.com/bootstrap/4.0.0/js/bootstrap.min.js"></script>
<title>My Album</title>
<style>
@import url("https://fonts.googleapis.com/css2?family=Gowun+Dodum&display=swap");
* {
font-family: "Gowun Dodum", sans-serif;
}
.mytitle {
background-color: green;
color: white;
height: 250px;
/* 내용물을 정렬 */
display: flex;
flex-direction: column;
align-items: center;
justify-content: center;
background-image: url("https://images.unsplash.com/photo-1511992243105-2992b3fd0410?ixlib=rb-4.0.3&ixid=M3wxMjA3fDB8MHxwaG90by1wYWdlfHx8fGVufDB8fHx8fA%3D%3D&auto=format&fit=crop&w=1470&q=80");
background-position: center;
background-size: cover;
}
.mytitle > button {
width: 150px;
height: 50px;
background-color: transparent;
border: none;
color: white;
font-size: 18px;
font-weight: bold;
border-radius: 5px;
border: 1px solid white;
margin-top: 20px;
}
.mycards {
margin: 20px auto 20px auto;
width: 1200px;
}
.mypostingbox {
width: 500px;
margin: 20px auto 20px auto;
padding: 20px 20px 20px 20px;
border-radius: 5px;
box-shadow: 0px 0px 3px 0px blue;
}
.mybtn {
display: flex;
flex-direction: row;
align-items: center;
justify-content: center;
margin-top: 10px;
}
.mybtn > button {
margin-right: 10px;
}
</style>
</head>
<body>
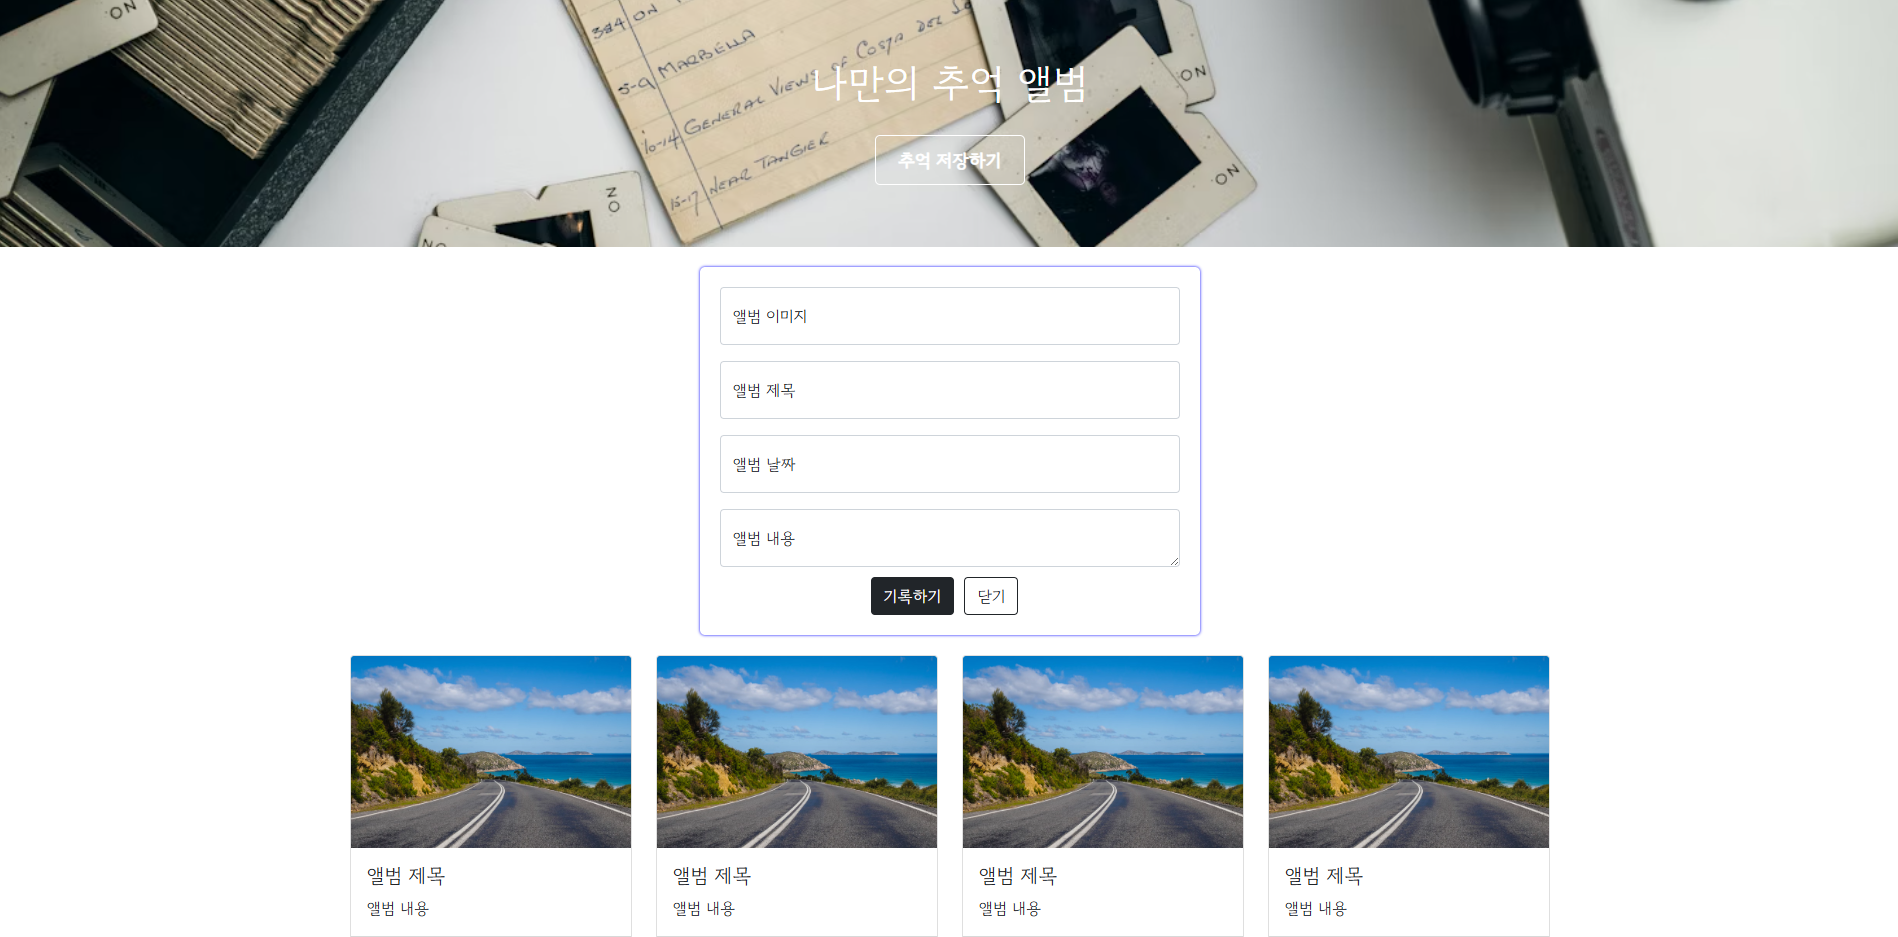
<div class="mytitle">
<h1>나만의 추억 앨범</h1>
<button>추억 저장하기</button>
</div>
<div class="mypostingbox">
<div class="form-floating mb-3">
<input type="email" class="form-control" id="floatingInput" placeholder="name@example.com" />
<label for="floatingInput">앨범 이미지</label>
</div>
<div class="form-floating mb-3">
<input type="email" class="form-control" id="floatingInput" placeholder="name@example.com" />
<label for="floatingInput">앨범 제목</label>
</div>
<div class="form-floating mb-3">
<input type="email" class="form-control" id="floatingInput" placeholder="name@example.com" />
<label for="floatingInput">앨범 날짜</label>
</div>
<div class="form-floating">
<textarea class="form-control" placeholder="Leave a comment here" id="floatingTextarea"></textarea>
<label for="floatingTextarea">앨범 내용</label>
</div>
<div class="mybtn">
<button type="button" class="btn btn-dark">기록하기</button>
<button type="button" class="btn btn-outline-dark">닫기</button>
</div>
</div>
<div class="mycards">
<div class="row row-cols-1 row-cols-md-4 g-4">
<div class="col">
<div class="card h-100">
<img src="https://images.unsplash.com/photo-1446768500601-ac47e5ec3719?ixlib=rb-4.0.3&ixid=M3wxMjA3fDB8MHxwaG90by1wYWdlfHx8fGVufDB8fHx8fA%3D%3D&auto=format&fit=crop&w=1446&q=80" class="card-img-top" alt="..." />
<div class="card-body">
<h5 class="card-title">앨범 제목</h5>
<p class="card-text">앨범 내용</p>
</div>
<div class="card-footer">
<small class="text-muted">앨범 날짜</small>
</div>
</div>
</div>
</div>
</div>
</body>
</html>
준비가 되었으니 JQuery를 적용해보겠습니다
추억의 앨범에 JQuery 사용하기
1
<script src="https://ajax.googleapis.com/ajax/libs/jquery/3.5.1/jquery.min.js"></script>
- JQuery를 사용하기 위에 위 코드를
<head>태그의 끝자락에 추가합니다
1
2
3
4
5
6
7
8
9
<!-- JQuery 스크립트 아래 작성 -->
<script>
  function openclose() {
    alert("안녕");
  }
</script>

<!-- 추억 저장하기의 <button> 태그 수정 -->
<button onclick="openclose()">추억 저장하기</button>
함수가 작동되는지 확인해보기 위해 <button>태그에 onclick을 작성합니다
그리고 실행시켜서 “추억 저장하기”버튼을 누르면 “안녕”이라는 메세지의 창이 뜨는 것을 확인할 수 있습니다
다음 목표는 “추억 저장하기”버튼을 누름에 따라 앨범을 저장하는 박스가 나타나거나 사라지도록 해볼 것입니다
1
2
3
4
5
6
7
8
<script>
  function openclose() {
    $("#postingbox").toggle(); // postingbox라는 id가 있는 태그를 찾은 뒤, toggle 실행
  }
</script>

<!-- .mypostingbox의 <div>태그에 postingbox라는 id추가 -->
<div class="mypostingbox" id="postingbox">
- JQuery를 사용하면
document.getElementById(아이디)를$(#아이디)로 줄여서 사용할 수 있습니다 - JQuery에 내장된 함수인 toggle함수를 사용하면 태그를 감추거나 나타나게 할 수 있습니다
다음은 “기록하기”버튼을 누르면 카드가 추가되도록 해봅시다
“추억 저장하기”버튼에서 했던 것 처럼 onclick을 붙여서 함수를 작동하면 됩니다
1
2
3
4
5
6
7
8
9
10
11
12
13
14
15
16
17
18
19
20
21
22
23
24
25
26
27
28
29
30
31
32
33
34
35
36
37
38
<script>
  function openclose() {
    $("#postingbox").toggle();
  }
  function makeCard() {
    // 이미지, 제목, 날짜, 내용 값 가져오기
    let image = $("#image").val();
    let title = $("#title").val();
    let content = $("#content").val();
    let date = $("#date").val();

    // HTML에 있는 카드 박스 내용을 복사해서 사용
    // image, title, content, date 변수에 있는 값은 ${변수}로 적용
    let temp_html = `
    <div class="col">
      <div class="card h-100">
        <img
          src="${image}"
          class="card-img-top"
          alt="..."
        />
        <div class="card-body">
          <h5 class="card-title">${title}</h5>
          <p class="card-text">${content}</p>
        </div>
        <div class="card-footer">
          <small class="text-muted">${date}</small>
        </div>
      </div>
    </div>`;

    // id=card가 붙은 태그에 위 html 템플릿을 추가
    $("#card").append(temp_html);
  }
</script>

<!-- <div class="mybtn">에 있는 <button> 태그에 onclick 추가 -->
<button onclick="makeCard()" type="button" class="btn btn-dark">기록하기</button>
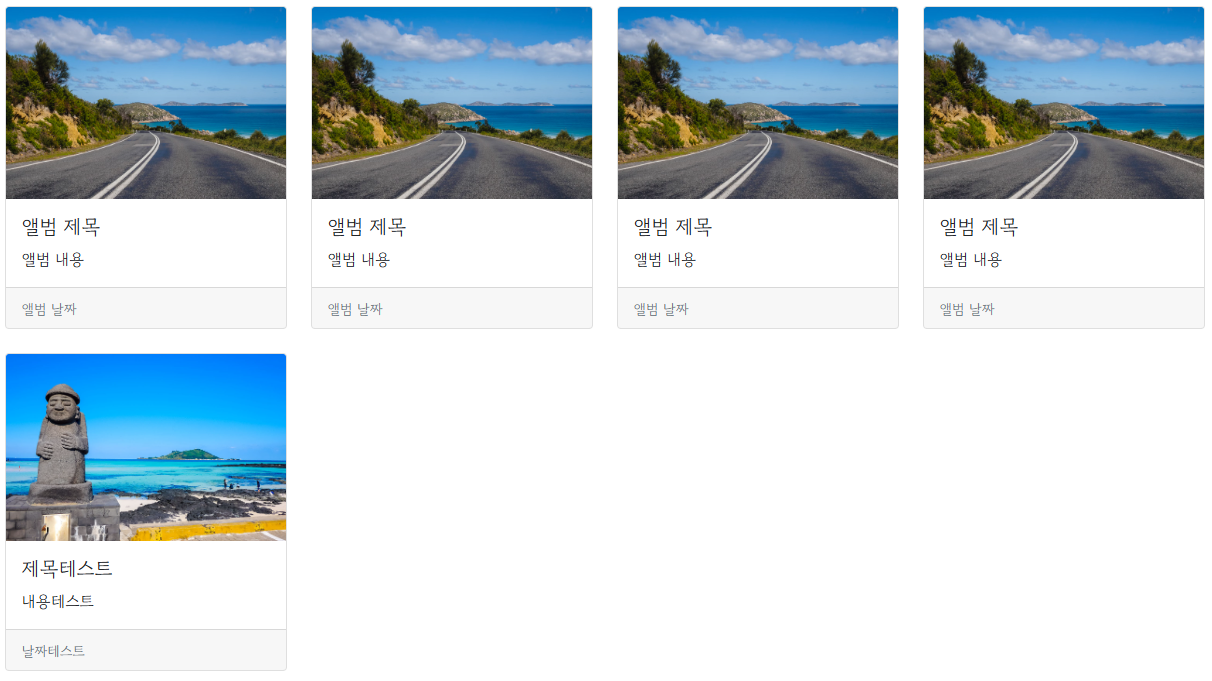
<div class="mypostingbox" id="postingbox">에 있는div > inpyt태그에 각각 id를 추가합니다- 추가한 아이디를 바탕으로 자바스크립트에서 값을 추출합니다
let image = $("#image").val(); - 템플릿을 추가하기 위해 카드가 담긴 태그에
id="card"를 추가해줍니다
fetch / 클라이언트 - 서버 개념
API는 2가지로 사용되는데 오늘은 GET만 알아보도록 하겠습니다
- GET : 통상적으로 데이터 조회(Read)를 요청할 때 (예: 영화 목록 조회)
- POST : 통상적으로 데이터 생성(Create), 변경(Update), 삭제(Delete)를 요청할 때 (예: 회원 가입, 탈퇴, 수정)
아래 주소는 현재 존재하지 않는 페이지입니다
“https://movie.daum.net/moviedb/main?movieId=68593”
이 주소는 “?”를 기준으로 크게 두 부분으로 쪼개집니다
- ? : 여기서부터 전달할 데이터가 작성됨을 의미
- & : 전달할 데이터가 더 있다는 뜻
예시) google.com/search?q=아이폰&sourceid=chrome&ie=UTF-8
위 주소로 검색한다면 google.com의 search에 다음 정보를 전달하게 됩니다
- q=아이폰 (검색어)
- sourceid=chrome (브라우저 정보)
- ie=UTF-8 (인코딩 정보)
자바스크립트에서 Fetch 사용하기
[코드니스펫] 미세먼지 Open API
http://spartacodingclub.shop/sparta_api/seoulair
“prac2.html”를 새로 만들고 시작하겠습니다
1
2
3
4
5
6
7
8
9
10
11
12
13
14
15
16
17
18
19
20
21
22
<!DOCTYPE html>
<html lang="ko">
    <head>
        <meta charset="UTF-8"/>
        <title>Fetch 시작하기</title>
        <script src="https://ajax.googleapis.com/ajax/libs/jquery/3.5.1/jquery.min.js"></script>
        <script>
            function hey() {
                let url = "http://spartacodingclub.shop/sparta_api/seoulair"; // API 주소
                fetch(url)                      // fetch 안에 API 주소 입력
                    .then((res) => res.json())  // 요청을 받은 데이터를 res라는 이름으로 JSON화
                    .then((data) => {           // JSON화된 데이터를 data라는 이름으로 개발자 도구에 출력
                        console.log(data["RealtimeCityAir"]["row"][0]);
                    });
            }
        </script>
    </head>

    <body>
        <button onclick="hey()">fetch 연습!</button>
    </body>
</html>
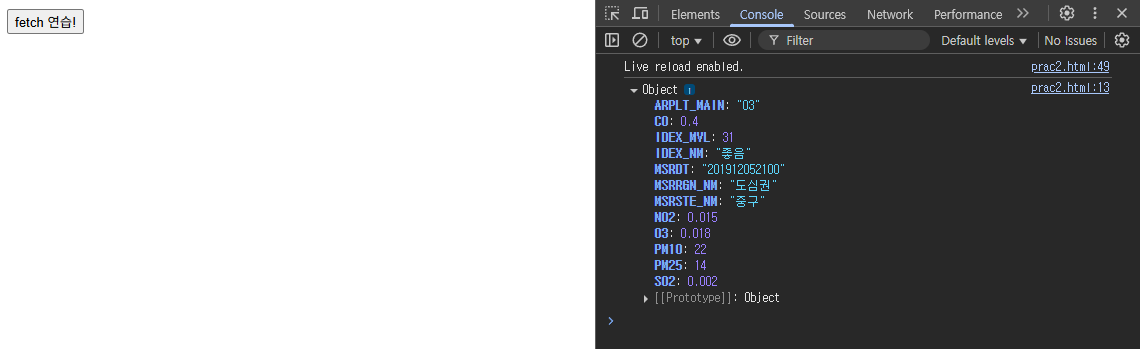
변수 url에 적힌 주소로 GET요청을 한 뒤 JSON화를 거치고 해당 데이터의 일부를 가져옵니다
처음 OpenAPI 주소에 있던 데이터를 보면 전체적으로 “RealtimeCityAir”, “row”로 감싸져있는 것을 볼 수 있습니다
만약 이 데이터로, 모든 구에 대해 “구 이름”, “미세먼지 수치”를 출력하고 싶다면
특정 데이터가 담긴 이름을 찾고 data['RealtimeCityAir']['row']에 대해 반복문 forEach로 출력하면 되겠습니다
1
2
3
4
5
6
7
8
9
let url = 'http://spartacodingclub.shop/sparta_api/seoulair';
    fetch(url).then(res => res.json()).then(data => {
        let rows = data['RealtimeCityAir']['row'];
        rows.forEach(a => {
            let gu_name = a['MSRSTE_NM'];
            let gu_mise = a['IDEX_MVL'];
            console.log(gu_name, gu_mise);
        });
    })
Fetch를 사용한다면
앞서 만들었던 추억의 앨범의 데이터를 서버에서 가져오거나 새로 만들어서 저장하여
나중에 다시 추억의 앨범을 열더라도 데이터가 저장되어 있는 서버와 통신하여 저장해둔 데이터를 가져올 수 있습니다